OVC4 Free Online Training
Congratulations on taking the first step to implementing the minimally invasive OVC4 into your practice and providing better clinical outcomes for your patients.
How to get started
- Request the lab prescription form – click here to do so.
- Select your first case
- Take an impression of the patient’s un-prepared tooth at the initial consultation appointment
- Send the impression together with the completed prescription form to Rhondium Dental Laboratories. View the impression requirements here.
- To refresh yourself on the procedure you can download a copy of the Instructions for Use here, and watch the below training videos.
- We will send the custom-made OVC4 back to you together with the Occlusal Seating Guide, McDonald Matrix Band, Wedges and 2 autoclavable Hex Sticks. Please allow up to 10 working days for your custom-made OVC4 to arrive.
Below you will find a collection of online training materials to build up your knowledge of the OVC4 and allow you to feel confident with the procedure.
Remember, there is a learning curve with the procedure which is normally around 3-5 cases.
The key conceptual difference between the OVC4 and regular crown procedures is that we can make the OVC4 from a “study-model” type of impression.
The impression is taken of the tooth PRIOR to any tooth preparation. This is normally during the patient’s consultation appointment.
The custom-made OVC4 uses a unique technology with a heat-cured occlusal layer and an uncured sub-layer that adapts to the tooth prep. This technology is what makes it all possible.
Quick Procedure Overview Video
Watch this quick 1 minute overview video to understand the general procedure before continuing with the more detailed instructional video below.
Detailed step-by-step instructional video
The video below will take you step-by-step through the OVC4 clinical procedure. It also shows you what to do if you have any difficulty placing the McDonald Matrix Band and how to build up the deep proximal box using the OVC Wedges.
Detailed Instructional Video
Itemised Menu of Detailed Video
00:04 – Impression instructions
00:10 – Using the Occlusal Reduction Guide to check occlusal distance
00:18 – How to build up a deep proximal box – if required
00:49 – Placing the McDonald Matrix Band: Method 1 – when it is straightforward
01:03 – Placing the McDonald Matrix Band: Method 2 – if it is more difficult
02:20 – The rest of the procedure, including;
02:37 – Use the Original Garrison Composi-Tight separating ring to form tooth separation that creates tight contacts
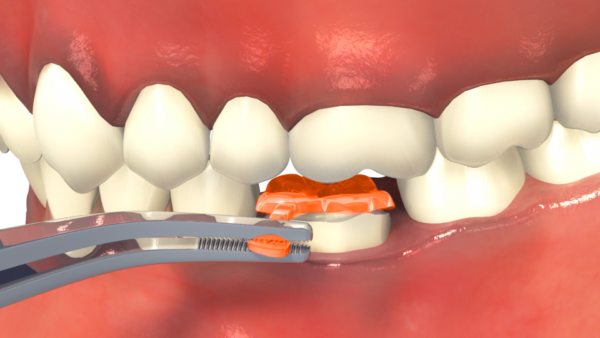
03:26 – Placing the OVC4
03:50 – Use the Seating Guide to ideally position the OVC4
05:28 – De-bond the matrix band and remove
06:14 – Clinical case studies
Downloadable Instructions for Use Brochure

It is essential to carefully read this document prior to completing your first OVC4 case. On the final page of the brochure is also a convenient chairside guide (pictured on the left) to have on hand to remind you of the steps as you complete your first few cases.
Download a PDF version of the instructions for use brochure here.
Preparing for your first case

For your first case we recommend allowing more time than usual as there is a learning curve. We recommend allowing one to one and a half hours and booking the appointment prior to your lunch break or at the end of the day where possible in case it runs over and you need more time.
Once you have completed a few OVC’s the time it takes to complete will dramatically reduce.
It is also worthwhile selecting an easier case for your first one. Click here to download a PDF showcasing some ideal first case situations.
Clinical Guidelines
A good case for the OVC includes any structurally compromised posterior tooth, in need of full occlusal coverage. Generally, any case where the McDonald Matrix Band can be retained in a stable position is suitable.
Below are resources that will help you decide if a case is suitable for the One Visit Crown (OVC):
See a PDF with examples of OVC clinical indications showing ideal OVC case examples.
To stabilise the McDonald Matrix Band during placement, you may wish to use the wedge technique. To see a video of this technique – click here.
Sometimes additional matrix stabilisation can be achieved by elevating the margins using the OVC Wedges that are in the kit. See a video showing deep margin elevation.
Note: If you have a plunging opposing cusp, you will need to re-contour it first.
For more visual examples of OVC clinical cases, please see our case studies.
For visual examples on prepping teeth for OVC procedures – click here for a PDF showing clinical case prep examples.
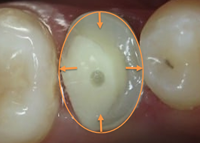
The key to prepping teeth for the OVC is to achieve enough occlusal reduction. Use the Occlusal Reduction Guide to check for adequate occlusal reduction.
Prepare the tooth with a round diamond bur of at least 1.2 mm diameter, followed by yellow strip tapered round-end diamond bur to remove sharp edges and polish the prep. Bevel the margins for better bonding, shade blending and easier matrix application.
Have questions about the removal of sound cusps and preserving tooth structure? Here is an article on compression dome theory that explains why this might produce a stronger overall restoration.
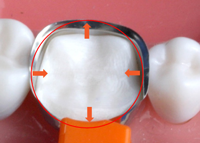
It is important to check the occlusal clearance. Allow at least 1 mm of clearance in the central fossa and 1.5 mm at the cusps and marginal ridges. OVC Occlusal Reduction Guides (which are the same thickness as the hard occlusal layer of the OVC) are supplied to confirm the minimum required clearance is achieved.


The Occlusal Reduction Guide can be covered on both sides with a coloured occlusal indicator spray such as Bausch Arti-Spray® to aid high spot identification. Place the sprayed Occlusal Reduction Guide over the dried prep and get the patient to gently bite. This will leave a coloured mark on the high spots that need further trimming.
Correct vertical height and positioning can be achieved through the use of the Occlusal Seating Guide, which is custom-made by our lab technician based on your patient’s tooth impression.

The best way to speed up the overall OVC procedure is to shape and carve the uncured composite rather than trimming cured composite.
In particular, it is especially worth spending a few extra moments to carve the proximal marginal ridges before curing as these are difficult to get right after the composite has cured.
To do this, we recommend the following:
After you are satisfied with the seating and occlusal position of the OVC, spot cure to stabilise the OVC, leaving the periphery uncured. To spot cure, use the spot curing tool.


After spot curing, the occlusal dimension will be fixed but the excess uncured material will extrude from the band.
 We recommend clearing away as much of this excess uncured material as possible with a fine instrument such as the IPC Off Angle Short Composite Instrument from Cosmedent.

After removing the excess material, you can carve the marginal ridge then light cure while masking the buccal side with the edge of the SpotCure instrument. This leaves the buccal composite uncured so that you can shape it. Undo the band or cut off the orange toggle to gain access to the buccal surface.
You may prefer to use Dr Terry Wong’s method, using a smoothing pad to smooth margins and reduce finishing time prior to curing.
Before polishing and finishing, please remember to fully cure the OVC from all sides. During the final cure, be aware of the heat emitted by your curing light and cool the tooth with air and water spray if the tooth is getting hot. Use your preferred burs, disks and polishers and then, if desired, a soft brush with polishing paste such as Cosmedent Enamelize for high shine.

Small localized dark areas on the prep, such as an amalgam tattoo or dark dentine spots, can shine through the restoration due to the high translucency of the material. To prevent this from happening, it is advisable to bond a white opaque flowable liner over the dark areas before OVC adaptation.
Remember that when you apply bonding agent to the tooth prep and air dry, it tends to splatter and coat the inside of the matrix band. It then bonds to the OVC and the band is virtually impossible to remove unless you DE-BOND the band first. De-bond the band by sliding a fine instrument interproximally between the band and the OVC. Approach from the buccal side. As you keep pressing, the band will pop free from the lingual side of the OVC. Often you need to prise the band away both mesially and distally before it will “pop”. Once popped, it can be pulled with tweezers from the lingual side.
If the contact is nice and tight the band needs to be wiggled out. Note that “over-tight” contacts resolve themselves within 24 hours by the neighbouring teeth moving (orthodontically). Remember that we are talking about 20-50 microns of movement. We recommend you tell the patient that you have done a really good job getting the contacts tight and ask them to floss it the following day and make a follow up appointment if it can’t be flossed.
Inter-proximal stripping of a very tight contact with a diamond strip is difficult, probably unnecessary (see above) and you can over do it, leaving an open contact point. It is better to leave it and deal with it if the patient still has a problem a week later (in Dr Simon McDonald’s experience, he has never had a patient complain of an over tight contact, a day or so later).
Check for occlusal interference in both central occlusion and lateral excursions. It is important to check for lateral excursion contacts and remove them to preserve the integrity of the restoration and for patient comfort.
The aesthetic appeal of the OVC can be enhanced by staining with coloured resins following the manufacturer’s instructions.
Frequently Asked Questions
FAQ’s
Many of our customers complete the OVC in around 30 minutes, including prep. When first starting out with the OVC, it is expected to take longer and we suggest allocating 60-90 minutes for your first case to prevent un-needed stress. Generally, we suggest that it takes around 3-5 OVC procedures before a dentist is proficient in the procedure.
There are many clinical situations where the One Visit Crown is the perfect compliment to your practice.
Converting large fillings to OVC’s – Often a patient presents with a tooth that needs to be heavily filled or crowned. The OVC can be a more affordable option for these patients.
As an alternative option for a crown or onlay – The OVC is an ideal full coverage restorative option for many patients, who appreciate the more efficient procedure.
For financially challenged patients – The OVC is a great option for patients that need a full coverage restoration but struggle to afford the treatment.
Technical FAQs
Achieving tight interproximal contacts every time can be very technique sensitive. Depending on your preferred technique and use of wedges and separating rings, there’s a number of ways to get a tight contact. We will cover a series of tips and techniques below:
Our most recommended method is creating strong separation using a separating ring such as the original Garrison Composi-Tight ring. View our videos section to see how this works.
Clinical Tip: Be aware of the balloon effect when pressing the OVC into the band
Please be aware that when you press the OVC into the matrix band it applies equal lateral pressure, like a balloon. This tends to force the band into a circular shape. With the premolar, we get a helpful effect.
On a lower molar this is unhelpful, as it tends to try to convert an oval shape into a circular shape. This pushes out lingually and inward inter-proximally.
To minimise the impact of this “balloon effect”, you can cut a dress-maker’s dart on the lingual size. This relieves the pressure. You can either place the dart towards one end or centrally on the lingual side.

Spot-curing the core of the uncured composite stabilises the crown in the vertical dimension, allowing you to trim the uncured composite from the peripheral surfaces easier. This reduces the finishing time.
You only need to cure long enough to stabilise the OVC and the time will depend on the power of your curing light. Too much curing will make it hard to trim the periphery of the OVC.
The most important point is to do most of the shaping before light-curing. Once it is set, the process is identical to finishing any other composite restoration.
It’s a very simple process – follow these easy steps:
- Remove excess composite with diamond or carbide burs of medium grit.
- Use fine grit to smooth off the surface.
- Use appropriate polishing discs.
- Use a soft brush with polishing paste.
Yes, absolutely. You can place the Occlusal Reduction Guide inside the Seating Guide to ensure that you have sufficient occlusal clearance.


The key deciding factor is “can you get the McDonald Matrix Band on and retained in a stable position?”.
The OVC Wedges are very useful for sub-gingival build-up. Click here for a PDF guide of instructions.
You can also build up one or more cusps by hand and once this is done, you can usually get the band on.
Once the band is on and stable, the process is the same. Note that deep areas need building up and curing before placing the OVC. If you don’t do this, you risk having uncured composite beneath the OVC.
These types of cases should only be attempted after you have become proficient with the procedure.
If needed, the occlusal contacts are easily adjusted with a fine grit diamond bur with generous water spray. You may need to adjust the opposing tooth if it has a plunging cusp. The trimmed areas can be further polished with yellow band diamond polishing burs, followed by your preferred ceramic polishing system.
Not necessarily. If the interfaces are left untidy and not polished properly when the OVC is placed, there is a possibility of staining in the future. If this does happen, the crown can be easily polished at a recall visit.
How to get started
- Request the lab prescription form – click here to do so.
- Select your first case
- Take an impression of the patient’s un-prepared tooth at the initial consultation appointment
- Send the impression together with the completed prescription form to Rhondium Dental Laboratories. View the impression requirements here.
- To refresh yourself on the procedure you can download a copy of the Instructions for Use here, and watch the above training videos.
- We will send the custom-made OVC4 back to you together with the Occlusal Seating Guide, McDonald Matrix Band, Wedges and 2 autoclavable Hex Sticks. Please allow up to 10 working days for your custom-made OVC4 to arrive.
Upcoming One Visit Crown Events

Free Introductory Webinar
Online
Several times available
Dr Graeme Milicich BDS
Register now